
How to make a D16 patch loom for Haltech Elite 550/750
- Jonathan Chow
- Jun 25, 2024
- 3 min read
Updated: Sep 21, 2025
Welcome to the first blogpost on the JCYT website. Thanks for reading.
The purpose of this post is to share some additional information for those looking to make a patch loom. I will update this as the video goes live and the questions come in.
Why? There are limited options for the D16 engine management, especially with the (OBD2?) P2K platform. The P2K engine harness although limited in its function, is sufficient for 99% of D16 builds.
What you need to make the patch loom.
- ECU header 178764-1 (3 receptacle) OR 174917-6 (2 receptacle)
- Assortment of 14-20g cable. 12v GROUND/POWER wires 14g, all other sensor inputs/outputs 20g is fine
- HT-030009 AMP 34 pin plug and pin set
- ECU header enclosure (V2. coming), new compact design will be available in the JCYT shop.
- HT-031014 Deutsch DTM-4 plugs and pins
- Braid sheathing (8mm, 12mm)
Here is the pinout.
https://docs.google.com/spreadsheets/d/1gEum9JHck5Cs0w-P1KeMIMxzbwfGqyWVmQqZvJP7hig/edit?usp=sharing

Thermo fan control with Haltech Elite

Using a digital pulsed output (DPO 1), a wire can be run to the green wire on green C131 plug(AUDM passenger kick panel near the ECU). This is Pin 6 or 7 depending on the car. It is the SOLID GREEN wire. Tap into the wire by using a scotch lok or hardwire if you choose. The thermo fan control works additional to the factory fan switch and is optional.
BASEMAP QUICKSTART GUIDE
Before any "tuning" is done. Please ensure your engine configuration settings are correct. Do not overlook this step. Failure to do so will result in tuning headaches down the track. Humble Performance have an excellent video which was very helpful. I can recommend watching this for a better understanding - https://www.youtube.com/live/NWluuwkSZis?si=az67pvtz-6dhQ9Sn
These settings will give the Haltech software a reference which should get your D16 fired up and hopefully running with some minor adjustments to the tune. Note: This is what i have put together for MY setup and may not be suitable to all D series. I will not accept any responsibility for damages caused by yourself shall you try these settings.
Engine Configuration
Trigger System
Fuel System
Ignition System
Engine Configuration (D16y4)
Engine capacity - 1595cc
Engine type - Piston 4 stroke
Numbers of cylinders - 4
Aspiration - Naturally aspirated (i haven't changed this since putting the turbo kit in, not sure if it will make much difference)
Max Cranking RPM - 380 (number above this value will tell the ECU the engine is running)
Engine geometry firing order - 1 3 4 2
Bank info - 1
Trigger system (you will need a timing gun for this step)
Trigger type - Generic - Standard - No Home
Tooth count Til start - 0
TDC angle - you will need a timing gun for this value
Enable TDC offset angle table
RPM filter level - 3
Quick start - Disable
Trigger signal
Sensor type - Hall effect
Edge - Falling edge
Filter level - 0
Pull up - Enable
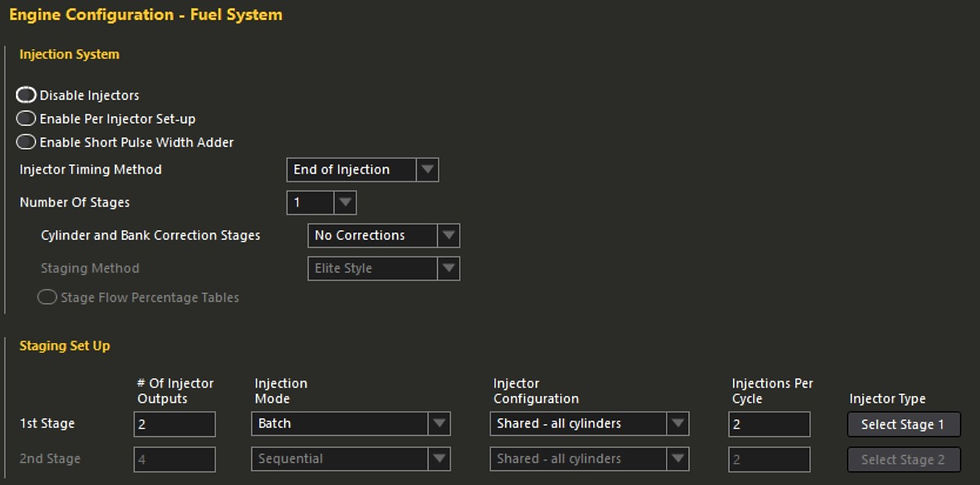
Fuel system (The D16y4 engine harness supports only batch ignition as per the patch loom wiring diagram. While this is not ideal, it does work but does not allow ECU control over individual injector fueling. It is recommended to manually wire in each injector separately)
Ignition system
Ignition mode - Distributor
Edge - Falling edge
Dwell mode - Constant charge
Any questions? Please comment on the original video and i will update this blogpost as we go.
Launch control settings (coming soon)


This is so awesome that you're happy to share this knowledge but also sell ready made adapters for people who can't or don't want to make their own. I hope to use this infomation to make a D16Y1 adaptor harness for either Link or Haltech.
Hey man can you please put a photo up of just the factory plugs it’s a little too small to see in the picture above or have a download for excel so I can download it. Cheers